
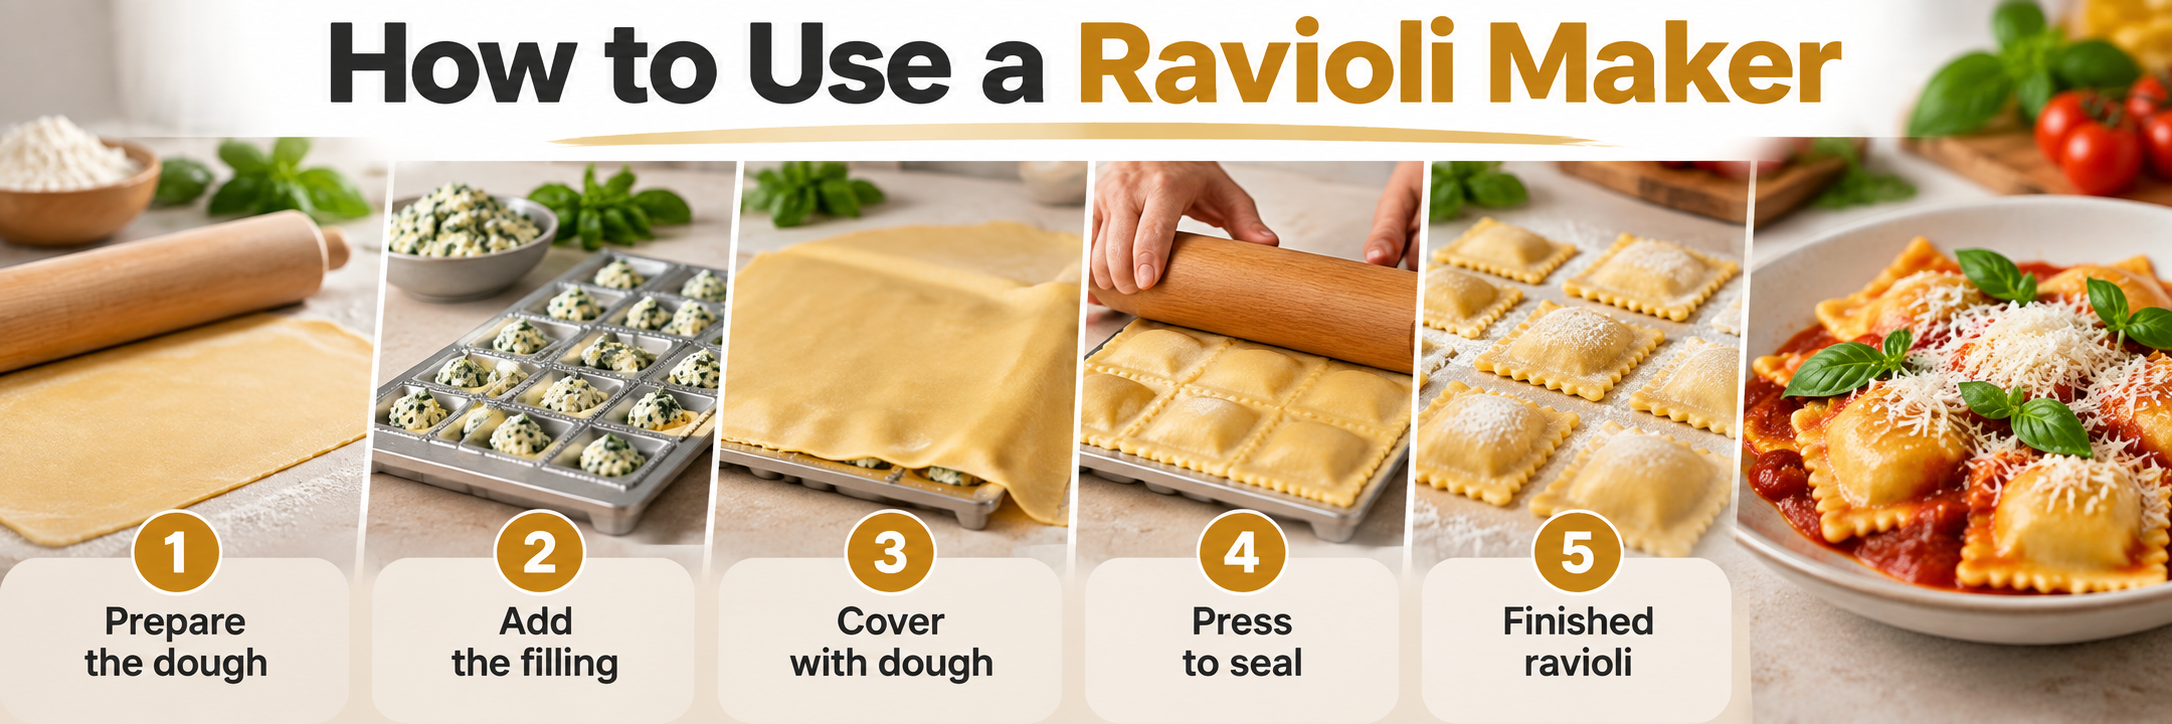
Learning how to use a ravioli maker is easier than it may seem. Whether you have a ravioli tray, stamp, or press, the basic technique is the same: roll fresh pasta into even sheets, add small portions of filling, remove trapped air, seal the edges, and cut the ravioli into individual pieces.
This beginner-friendly guide explains how to make homemade ravioli step by step, how to use different ravioli-making tools, and how to prevent common problems such as sticking, torn dough, leaking filling, and ravioli opening during cooking.
What You Need Before Using a Ravioli Maker
Gather your ingredients and equipment before you begin. Fresh pasta dough can dry out when left uncovered, so preparing your workspace first makes the process easier.
- Fresh pasta dough: Prepared, kneaded, and rested according to your preferred recipe.
- Ravioli filling: A relatively thick filling, such as ricotta and spinach, that will not spread easily.
- Ravioli maker: A ravioli tray, stamp, cutter, or press.
- Pasta machine or rolling pin: For rolling dough into thin, even sheets.
- Flour: A small amount for preventing sticking.
- Small spoon or piping bag: For portioning the filling neatly.
- Clean tray: For holding the finished ravioli before cooking.
If your filling contains vegetables, drain away excess moisture before assembling the ravioli. A filling that is too wet can soften the pasta and make the edges harder to seal. Keep unused dough covered while you work.
How to Use a Ravioli Maker Step by Step
Follow these seven steps to make ravioli with a tray or stamp. The exact cutting method varies by tool, but the dough preparation and sealing principles are similar.
Step 1: Prepare the Pasta Dough
Start with fresh pasta dough that has been mixed, kneaded, and allowed to rest according to your recipe. Resting makes the dough easier to roll and helps reduce its tendency to spring back.
Divide the dough into smaller portions. Work with one portion at a time and keep the others covered with a clean cloth or suitable wrap. If the dough feels excessively sticky, use a light dusting of flour rather than adding large amounts.
Step 2: Roll the Dough into Thin, Even Sheets
Use a pasta machine or rolling pin to create a thin, consistent sheet. It should be flexible enough to fit around the filling but strong enough to resist tearing. An uneven sheet can produce ravioli with thick edges and delicate centers.
When using a pasta machine, begin with a wider setting and gradually move to thinner settings. Avoid forcing a thick piece of dough directly through a very narrow setting. The ideal final thickness depends on your recipe, dough, and ravioli maker.
Prepare a second sheet for covering the filling. Try to keep both sheets similar in thickness so they cook evenly.
Step 3: Position the Pasta on the Ravioli Maker
For a ravioli tray: Lightly flour the mold if needed, then place the first pasta sheet over the cavities. Allow the dough to settle gently into the spaces without stretching it tightly. Follow your tray manufacturer’s instructions if it includes a forming plate.
For a ravioli stamp: Place the pasta sheet flat on a lightly floured work surface. Leave enough room between filling portions for the stamp to cut and seal each ravioli.
Make sure your hands and tools are reasonably dry. Excess moisture on the work surface can cause fresh pasta to stick.
Step 4: Add the Ravioli Filling
Place a small amount of filling in the center of each cavity or at evenly spaced positions on the pasta sheet. Start with less filling than you think you need. You can increase the quantity after seeing how much your tool can hold without overflowing.
Keep the sealing areas free of filling. If ricotta, sauce, or another ingredient spreads onto the edges, wipe it away before covering the ravioli. Clean edges are essential for a reliable seal.
Beginner tip: A piping bag can make portioning soft fillings easier and less messy, but a small spoon works well too.
Step 5: Cover and Seal the Ravioli
Carefully place the second pasta sheet over the filling. Beginning near each mound, gently press the dough around the filling to push out trapped air. Work outward toward the edges rather than pressing directly on top of the filling.
Press the pasta layers together along the sealing areas. If the dough is slightly dry, a very small amount of water on the edges may help. Avoid soaking the pasta because too much water can make it slippery or sticky.
Removing air matters because trapped pockets can expand during cooking and place pressure on the seams. A properly sealed ravioli should have filling in the center and a continuous border of joined pasta around it.
Step 6: Cut and Separate the Ravioli
With a ravioli tray, use the supplied rolling pin or the cutting method recommended for your model. Apply steady, even pressure to define the borders and separate the pieces. Remove the ravioli carefully to avoid tearing the bottoms.
With a ravioli stamp, center the stamp over each mound of filling and press firmly through the pasta layers. Lift the stamp straight up, remove excess dough, and inspect the sealed edges.
If an edge appears loose, gently press it together with your fingers. Save usable dough scraps according to your pasta recipe rather than allowing them to dry out on the counter.
Step 7: Prepare the Ravioli for Cooking
Arrange the finished ravioli in a single layer on a lightly floured tray. Leave a little space between pieces so they do not stick together. Check for tears and weak seams before cooking.
Cook fresh ravioli in gently boiling salted water according to your pasta recipe. Avoid overcrowding the pot, and use a slotted spoon to lift delicate pieces out of the water. Cooking time varies with the thickness of the dough, the size of the ravioli, and the filling.
How to Use a Ravioli Maker Tray
A ravioli tray is designed to shape several pieces at once. It is a practical choice when you want uniform ravioli or plan to prepare a larger batch.
- Lightly flour the tray if required.
- Lay a pasta sheet across the cavities.
- Gently form the dough into the cavities without tearing it.
- Add a modest amount of filling to each cavity.
- Cover with a second pasta sheet and remove trapped air.
- Seal and cut the ravioli using the tray’s recommended method.
- Carefully release the finished pieces.
Some trays include a separate plastic forming plate, while others use a rolling pin to cut along raised edges. Check the instructions supplied with your specific tool rather than assuming every tray works identically.
For a detailed comparison of the two popular styles, read our ravioli stamp vs ravioli tray comparison.
How to Use a Ravioli Stamp
A ravioli stamp cuts individual ravioli from two layers of pasta. Unlike a tray, it lets you choose where to position each piece and adjust the spacing to suit the filling.
- Place a pasta sheet on a lightly floured surface.
- Arrange small mounds of filling with enough space for the stamp.
- Cover with a second pasta sheet.
- Press gently around each mound to release trapped air.
- Position the stamp around the filling and press firmly.
- Lift the stamp and check that the edges are sealed.
Stamps are useful when you want more flexibility over ravioli size and placement. However, cutting pieces individually can take longer than making a full tray at once. Some stamps have crimped edges that help press the pasta layers together, but you should still inspect the seams.
Ravioli Tray vs. Stamp: Which Is Easier for Beginners?
| Feature | Ravioli Tray | Ravioli Stamp |
|---|---|---|
| How it works | Shapes multiple ravioli in a mold | Cuts individual ravioli |
| Best for | Consistent batches | Flexible placement and smaller batches |
| Portion size | Determined by mold cavities | Determined by stamp size and filling |
| Beginner challenge | Releasing filled pasta from the tray | Spacing and cutting each piece |
| Typical advantage | Uniform shape and batch preparation | More control over individual pieces |
Neither tool is automatically better for everyone. Choose a tray if you value consistent batches, or a stamp if you prefer working with individual ravioli. Both require practice with dough thickness and sealing.
Common Ravioli Maker Mistakes to Avoid
1. Adding Too Much Filling
Overfilling pushes ingredients toward the seams and makes it difficult to close the pasta securely. Begin with small portions and increase them only if your ravioli maker has enough space.
2. Letting the Pasta Dough Dry Out
Dry dough can crack or resist sealing. Keep unused dough covered and assemble the ravioli soon after rolling the sheets. If necessary, lightly moisten dry sealing edges rather than wetting the entire sheet.
3. Trapping Air Around the Filling
Air pockets can expand in hot water and put pressure on the seams. Gently press around the filling before sealing, working outward without squeezing the filling into the border.
4. Using Too Much Flour
Flour helps prevent sticking, but excess flour between pasta layers can interfere with sealing. Dust surfaces lightly and brush away obvious excess from the edges before joining the sheets.
5. Not Checking the Seal Before Cooking
Even well-shaped ravioli can have a weak corner. Inspect each piece before cooking and press together any edges that have not joined completely.
6. Using Filling That Is Too Wet
Watery fillings can soften the dough and leak during shaping. Drain cooked vegetables thoroughly, let hot ingredients cool appropriately before assembly, and use a filling consistency that holds its shape.
Troubleshooting Ravioli Maker Problems
| Problem | Possible Cause | What to Try |
|---|---|---|
| Ravioli stick to the mold | Wet dough or insufficient dusting | Use a light dusting of flour and avoid stretching dough into cavities |
| Ravioli open while cooking | Weak seals, trapped air, or overfilling | Use less filling, remove air, and inspect edges |
| Pasta tears around filling | Dough too thin, stretched, or overfilled | Roll slightly thicker sheets and reduce filling |
| Edges will not stick | Dry dough or excess flour | Brush away flour and lightly moisten the edges if needed |
| Ravioli stick together | Pieces stored touching each other | Arrange in a single layer on a lightly floured tray |
How to Store or Freeze Homemade Ravioli
If you are not cooking the ravioli immediately, avoid leaving filled fresh pasta at room temperature for an extended period. The appropriate storage time depends on the filling, especially when it contains cheese, meat, or other perishable ingredients.
For freezing, place the uncooked ravioli in a single layer on a tray so the pieces do not touch. Freeze until firm, then transfer them to a suitable freezer-safe container or bag. Label the container with the date and filling type.
Frozen ravioli can often be cooked directly from frozen, although they may need more time than fresh ravioli. Follow a suitable recipe and ensure the filling is cooked safely, particularly if it contains meat.
For safe storage of homemade ravioli, especially when using cheese or meat fillings, follow proper refrigeration and freezing practices. You can find helpful food storage recommendations in the FoodSafety.gov cold food storage guidelines.
Frequently Asked Questions About Using a Ravioli Maker
Do you need to flour a ravioli maker?
A light dusting of flour often helps prevent sticking, especially with a ravioli tray. Avoid using too much, because flour between the pasta layers can make sealing more difficult. Follow your tool’s instructions.
How do you keep ravioli from sticking to the maker?
Use a small amount of flour, avoid excessively wet dough, and release the finished ravioli carefully. Do not force dough tightly into a tray cavity, as stretching can make removal more difficult.
Why does my ravioli open while cooking?
Common causes include overfilling, trapped air, and edges that were not sealed completely. Keep filling away from the seams, remove air before cutting, and inspect each ravioli before cooking.
Can beginners use a ravioli maker?
Yes. Both ravioli trays and stamps are suitable for beginners. A tray helps shape several pieces consistently, while a stamp offers control over individual pieces. Start with a small batch while learning how much filling to use.
How thick should pasta dough be for a ravioli maker?
The dough should be thin enough to cook evenly but sturdy enough to hold the filling without tearing. The right thickness depends on your pasta recipe and tool. Roll gradually, keep the sheet even, and test a small batch before preparing all the dough.
Can you freeze ravioli before cooking?
Yes. Arrange uncooked ravioli separately on a tray, freeze until firm, and then transfer them to a freezer-safe container. Handle perishable fillings safely and cook the ravioli thoroughly when ready to serve.
Final Thoughts
Learning how to use a ravioli maker comes down to a few reliable habits: prepare manageable pasta sheets, use a thick filling in small portions, remove trapped air, and seal every edge before cooking. Once these basics feel familiar, both trays and stamps can help you make homemade ravioli more consistently.
If you are choosing your first tool, explore our guide to the best ravioli maker for beginners to compare your options before buying.